Key Testing Procedures for UV Shrink Sleeve Printing
UV shrink sleeve printing is a dynamic process requiring meticulous attention to variables like ink selection, substrate treatment, UV curing settings, and film weights. Managing these factors effectively—alongside rigorous quality control testing—ensures consistent, high-quality results for your printed shrink sleeve labels.
At Zeller+Gmelin, we manufacture high quality dual-cure UV/LED inks that print on shrink seamlessly. In this blog, we’ll review some essential quality control properties and testing methods that can elevate your shrink sleeve printing game.

Quality Control Properties
Ensuring quality involves testing several critical properties:
- COF (Coefficient of Friction) – Kinetic and static
- Adhesion
- Shrinkability
- Blocking
- Flex
Each property contributes to the overall performance and durability of the shrink sleeve. Here’s how to test and manage them effectively.
Testing Procedures and Best Practices
1. COF (Kinetic and Static)
The coefficient of friction (COF) plays a crucial role in the application of shrink sleeves. Customers may require either slippery or controlled COF depending on their equipment.
Kinetic COF: This measures friction in motion, such as sleeves sliding over bottles. Too low, and the sleeves may bunch up; too high, and they may not slide properly. Typical ranges are 0.2–0.3.
Static COF: This measures the force needed to overcome static friction, crucial for preventing blocking when sleeves are stacked. Typical ranges are 0.2–0.6.
Testing Tip: Use a slip/peel tester under ASTM D-1894 standards for accurate COF measurements. Note that slide angle testers only measure static COF.
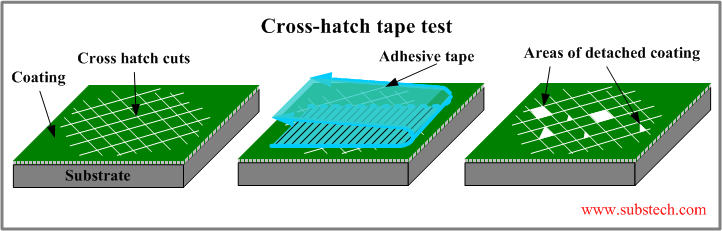
2. Adhesion
Adhesion ensures the ink bonds securely to the substrate. For UV shrink inks like NUVAFLEX which achieve shrink percentages similar to solvent gravure inks, adhesion testing goes beyond basic tape tests.
- Use crosshatch testing with standard 3M 600 or 810 tape.
- Activate adhesion with in-line corona treatment rather than focusing solely on dyne levels.
3. Shrinkability
Shrinkability is critical to ensure that the ink film adheres smoothly and resists defects like microcracks or flake-off.
Testing Methods:
- Boiling water soak (30 seconds): The most aggressive and revealing test.
- Industrial hot air dryer: A more practical, everyday option.
- Steam kettles or blowers: Also effective for shrink testing.
Check for smooth shrinking with no durability issues, opacity loss, or matting.
4. Blocking
Blocking can occur if sleeves cling or stick together, impacting application performance and final product quality.
- Simple Test: Fold a printed article ink-to-ink, press it with your thumb and forefinger, and check if the layers slide cleanly.
- Advanced Testing: Use slip/peel equipment for a more detailed analysis.
Proper curing tests confirm that the ink doesn’t stick to itself or the container in high-humidity environments.
5. Flex
Flex testing evaluates how well the printed ink withstands crumpling and twisting.
- Bicycle Crumple Test: Hold a sample in both hands, twist it in opposite directions, and inspect for flaking or cracking.
Flexibility testing ensures the ink can endure the rigors of shrink application and handling without compromising quality.
Final Thoughts
UV shrink sleeve printing is an art and science, and quality control is the glue that holds it all together. From COF to flex testing, each procedure offers insights that help you refine your process and deliver exceptional results to your clients.
By mastering these testing techniques, you can avoid costly reprints, reduce waste, and build trust in your printing expertise.
Need advice on inks or testing procedures? Contact the Ink Experts at Zeller+Gmelin—we’re here to help you achieve shrink sleeve perfection!